
Looking to create a Facebook page for your practice? It’s simple.
To get started, all you need is a personal Facebook account. However, there’s a difference between having a dull, cookie-cutter social media presence and having a social media presence that keeps patients engaged with your practice.
You don’t need a degree in creative design. Nor do you need to be an expert in computer programming. But there are some necessary ingredients to build a chiropractic Facebook page that engages current patients and entices prospective patients.
Below, you’ll learn how to do so in five steps.
![]()
1. Create Your Page
To begin creating your page, visit the Facebook Business Page Creator. Your first step is to choose a category. Choose the first option, labeled “Local Business or Place.” After making your selection, you’ll fill out your practice address, phone number, and other general information about your practice.
Important: Be sure that your Facebook practice details match what is listed on your website and other directory listings.
Next, you’ll need to name your page. This is more important than it may seem. Giving your page a generic name, or stuffing the title with keywords, can put off an unprofessional or spammy appearance. Moreover, your official page name determines the URL of your account, which should be clean and easy to remember.
2. Customize Your About Section
The next step is to complete your “About” page. Here you will provide a brief introduction of your practice. The About section is a place users can go to learn more about you.
Like your page name, this shouldn’t be taken lightly. Your description should be concise, while describing your practice in a compelling way.
Before diving into social media marketing, you have to reinforce your brand. And your About page is a key branding element.
Ultimately, it should answer one question: “Why should I choose you as my chiropractor?”
Note: While social media is an important marketing tool, it is merely an extension of your practice website. So be sure to link to your website on your About page.
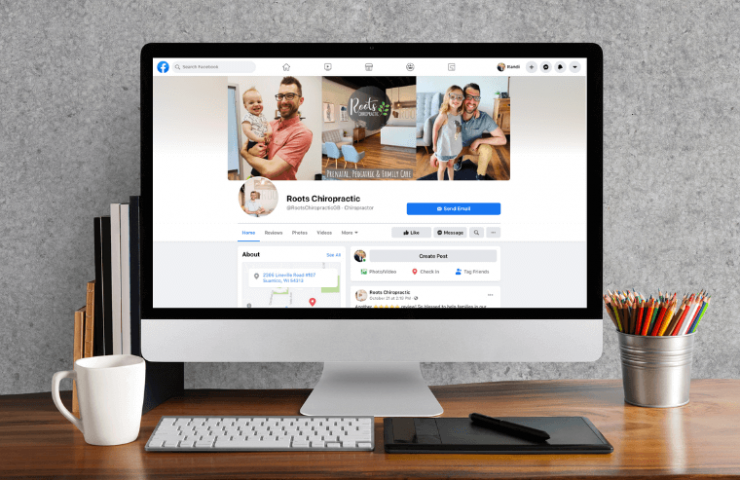
3. Make Your Page Visual
A personalized Facebook page helps differentiate your practice. Impressive visuals are essential to make your page stand out from the crowd. There are two places to showcase your visual branding: your cover photo and profile photo.
Your profile photo is the smaller image that appears at the top left of your page. We recommend using one of two options for your profile photo:
- For single-doctor practices, use a headshot of the doctor
- For multi-doctor practices, use your practice logo
After uploading your profile photo, you’ll need to add a cover photo. This is the large rectangular image that spans the top of your page. To reinforce branding, look at the homepage of your practice website. Replicating a similar look and feel will strengthen the recall of your brand when patients see your practice on different marketing channels.
Here are the dimensions Facebook recommends for photos:
- Profile photo: 400 x 400 px
- Cover photo: 828 x 315 px
- Shared images: 1200 x 900 px
4. Learn the Admin Panel
You now have the essentials of a great chiropractic Facebook page. But this is just the beginning. As you begin posting, it would help to become familiar with the Admin Panel. Here you can check messages, view notifications, measure performance, and update your profile.
At the top of your business page, you’ll see five tabs:
- Page: Takes you back to your homepage, where you will see all of your posts.
- Messages: Displays and allows you to respond to recent messages.
- Notifications: Reveals your latest page activity (comments, shares, likes, etc.).
- Insights: Shows general page performance based on a specified date range.
- Publishing Tools: Displays analytics on individual posts, such as views and shares.
Next, you’ll want to get familiar with the Settings page. To the right of the five menu items listed above, you will see a Settings menu. Here you will be able to make general page updates.
Below are a few to take note of:
- Edit Page: Remove, add, or rearrange the tabs on the left menu of your page.
- Notifications: Edit what kind of activity alerts you would like to receive.
- Page Roles: If you want other staff members to post on your page, you’ll have to grant them access. If you want to limit their abilities, there are different levels of access you can grant.
5. Create Compelling Content
Your Facebook page is now complete. At least, the setup process is. Now is where the real work begins – creating content.
Building an engaging social media presence requires a strategy.
What it’s not about? Posting random thoughts on your page whenever something pops in your head.
What it is about? Building a structured publishing schedule that provides useful content that patients get excited about.
A thoughtful social media strategy includes scheduling a variety of content – a mixture of “salesly” content and entertaining content. The best way to do so is to build a weekly calendar.
For example, here’s what a typical week might look like:
- Monday: Inspirational quote
- Tuesday: Link to a blog post on your practice website
- Wednesday: Useful health tip or chiropractic fun fact
- Thursday: Invitation to schedule your next appointment
- Friday: Fun fact, funny photo, or “Happy Friday” message
Social media users have become increasingly visual, so when building out your social media calendar, think about what images you could attach to your posts. For specific post ideas, read 29 Chiropractic Facebook Post Ideas to Make You a Social Media Genius.